To Properties
What is the Transfer to Properties
The Transfer to Properties allows you to permanently transfer properties from the DataView onto the associated model objects in Navisworks.
|
|
|
|
|
Transfer to Properties can be used to import Properties into the 3D model from Excel or SQL Server for instance. |
Configuring a Transfer to Properties
- From BimSens main form, in the top toolbar, open the
 Transfer Dialogue
 - Select Model Transfer and click New Transfer
- In the selection menu, pick Transfer To Properties. the Transfer Configuration Dialogue opens
- Give the transfer a Name
- Specify the name of the Category to which properties will be transferred (Categories are the tabs in the Navisworks Properties palette).
- Select the conflict resolution to apply if a tab with the same name already exists:
- Merge: Add the new properties, update the matched properties, and keep the previous ones
- Replace Match: For all matched objects, replace the entire tab with the new tab, thus deleting other properties from that tab even if they are no longer part of the transfer
- Replace All: Delete the tab on all objects (matched or not) before running the transfer
The Delete Now button will perform the same clean up as the Replace All function, but not run the transfer.
|
|
|
|
|
Be careful when activating the option Replace All or using the command Delete Now. Any existing data in the corresponding tab will be irreversibly deleted. If you click the button Clean Now with the wrong Category Name the data in the corresponding tab will be deleted regardless. |
|
|
|
|
|
The Delete Now button can be used to remove any user tab (not tabs from the source file), generated by BimSens or not. Simply type in the name of the tab to delete and click the button. |
- Activate the option Transfer Properties for top level Objects only to transfer properties onto objects that have direct match in the DataView. If you leave this option unchecked, the properties will be transferred on the direct match and all its descendant nodes in the tree.
- When transferring date properties you can choose to transfer them as text with a given format
- Select the Fields to transfer from the DataView, and order them as needed.
- Activate the option Terminate the Transfer when an error occurs for the transfer to stop when an error is raised. If you do not activate this option, the error message will be written in lieu of the property values and the Transfer will continue for other objects.
- You can click Run Now to run the Transfer immediately, or click OK to save the configuration and run the Transfer later. Configured Transfers can be run in one click from the Transfer Dialogue.
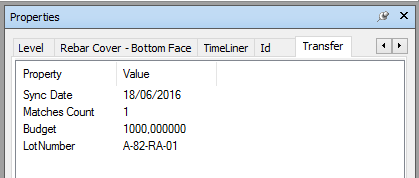
A tab with the Category Name is created with the transferred Properties. Two additional Properties are automatically created, the Sync Date and the Matches Count.
- The Sync Date is the data date, e.g. the date at which you last refreshed the data, not the date at which you performed the Transfer
- The Matches Count is the number of matches for the object in the DataView. When an object has multiple matches, the different values of the same Property are numbered #2, #3 etc.


