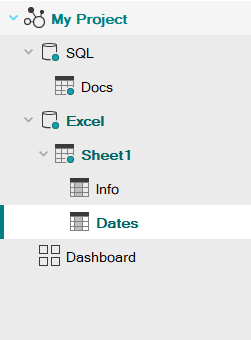
Sources Manager Tree
|
|
|
|
|
Have a quick look at the Terminology of BimSens before reading this section. |
General Organisation
Data connections are configured through the Projects Tree.
The Projects Tree is located on the left side of BimSens panel, you can toggle it on and off clicking the side bar.

- the
 icon represents Projects file loaded from the disk
 - the
 icon represents DataSources
 - the
 icon represents DataViews
 - the
 icon represents Layouts
 - the
 icon represents Boards
Project and Board can also have bespoke icons defined in the App.
Nodes that share their parent can be reorganised by drag and drop (e.g. Layouts of a DataView, DataViews of a DataSource, etc.). They can also be organised into folder and sub folders.
|
|
|
|
|
While both Board and DataSource can be reordered, the Projects Tree is always built with DataSource first. So DataSource and folders containing DataSource will show up first, then hybrid folders containing DataSource and Board then folders containing Board will come last. |
Tree Appearances
Nodes showing in bold teal font are ancestors of the active DataView, Layout or Board.
The node highlighted with white background is the active DataView, Layout or Board currently showing in the grid.
When a DataSource or DataView has been loaded at least once, it is showing with a green dot ![]() to represent the fact that it contains data and does not need further authentication or refresh to be displayed in the grid. Switching between DataView already loaded is much faster as it does not reload data unless changes have been detected.
to represent the fact that it contains data and does not need further authentication or refresh to be displayed in the grid. Switching between DataView already loaded is much faster as it does not reload data unless changes have been detected.
Hidden Nodes
Starting with BimSens 2.0.2.2, tree nodes can be hidden from users that do not have an Developer licence. This allows configuring DataSources and DataViews to compose in Boards and hiding the nodes that are not necessary for the end users.
To hide a node, right click it and click the Hide / Show button. While in Developer mode, hidden nodes have a ![]() overlay to reflect that they will not be visible to users with lower licence level.
overlay to reflect that they will not be visible to users with lower licence level.
When is the Data Refreshed?
The DataSource and DataView are only authenticated or refreshed when you first activate a child DataView or Layout. Double clicking a DataView will not refresh the data from the server; to force refreshing the data, either click the Refresh button ![]() from the bottom toolbar, or right click the DataView node in the tree and click Refresh.
from the bottom toolbar, or right click the DataView node in the tree and click Refresh.
To learn more about the different ways the data can be refreshed, see the section on Refreshing the Data.
Context Menus
The Projects Tree provides access to configuration commands via right click menu. Different commands will be available depending on the type of node that is clicked:
- Right click anywhere below the last tree node to open the menu to add a New Project. If you choose to add a New DataSource directly, it will be added to the active Project, or a blank Project will be created automatically to host it.
- Right click a Project Node to Configure, Save or Delete the Project as well as add a New DataSource.
- Right click a DataSource Node to perform a DataSource Refresh, Configure, Save, Close or Delete the DataSource as well as add a New DataView.
You can also add a New DataSource to the parent Project with an option to duplicate the one associated to the node that was clicked.
- Right click a DataView Node to Refresh the data, Configure, Save, Close or Delete the DataView as well as add a New Layout.
You can also add a New DataView to the parent DataSource with an option to duplicate the one associated to the node that was clicked.
- Right click a Layout Node to Refresh the data of its underlying DataView, Configure, Save or Delete the Layout.

