Walk through: Set up a SQL Server Data Source
In this Walk Through
This section demonstrate how to set up a complete connection with a SQL Server database step by step, allowing users to edit data, create and delete objects.
The test scenario uses a database containing a list of activities with planned start and finish dates, and a list of sub tasks or "Rules of credit" for each activity. The users will be able to report actual start and finish of each activity and progress of each rule of credit. Additionally the users will be able to add or remove rules of credits for each activity by executing stored procedures on the server.
Definition of the sample database
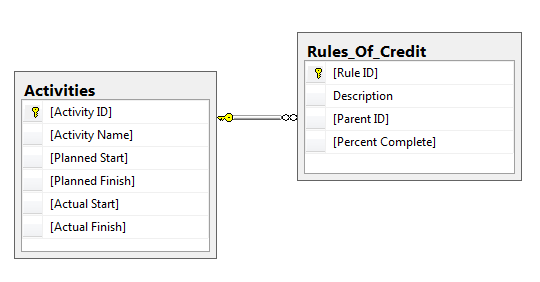
For the demonstration we will use a database with 2 tables, Activities and Rules_Of_Credit:
- The Activities table contains the activities, defined by an ID, name, planned start and finish dates. It contains 2 additional empty columns for users to report actual start and finish. The primary key (UID) of the table is the Activity ID column.
- The Rules_Of_Credit table contains the rules of credit, defined by an ID, a description, the ID of the parent activity and an additional empty column for users to report the percentage complete. The primary key of the table is the Rule ID column. Finally the Parent ID column is a foreign key to the Activity ID of the Activities table (it can only take values that already exists in the Activity ID)
The following diagram summarises the set up:
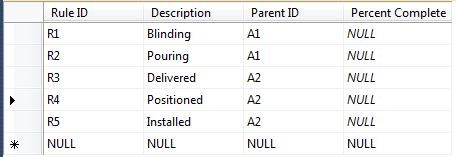
The 2 tables are loaded with sample data:

Create a New SQL DataSource
Start by creating a New Microsoft SQL Server DataSource:
- Right Click the Projects Tree anywhere in the blank area, or on an existing Project.
- Click New DataSource
- In the DataSources dialogue, double Click the Microsoft SQL Server DataSource, or Select it and click Configure.
- Enter the Server, Database and user information and click Test.
- Once the connection information is correct, click Add DataView.
You can now define the Read query to load data from the server
Loading data from the server
The user will have to see the data from both tables, with the rules of credit for each activity. To show the data from both the Activities and the Rules_Of_Credit tables, in the Read tab, we will use the following JOIN query:
SELECT *
FROM Activities LEFT JOIN Rules_Of_Credit
ON Activities.[Activity ID] = Rules_Of_Credit.[Parent ID]
If you are unsure of the tables, views or columns names, you can use the Object Browser to get a list of the available objects. from the Object Browser you can insert an object name in your query by double clicking it in the tree or by selecting multiple objects and clicking Use Selected.
This set-up is sufficient to define a read-only connection. To end the configuration here you can click OK to close dialogue, then double click the DataView node in the Projects Tree to activate the DataView.
Defining writing permissions
If you are not already in the SQL Configuration Dialogue, right click the DataView node in the Projects Tree and click Configure to reopen it.
To authorise the users to modify the Actual Start, Actual Finish and Percent Complete columns we need to provide the update details for the 3 columns from the Write tab:
- The column Actual Start stands in the Activities table and the primary key of the table is the Activity ID column.
- Idem for the column Actual Finish.
- The column Percent Complete stands in the Rules_Of_Credit table and the primary key of the table is the Rule ID column.
Using the See Permissions button, you can access the list of columns on the server with access permissions, owning table and table key. You can add columns to the Write permission of the DataView from this list by double clicking the column to add or by selecting several columns and clicking Use Selected.
|
|
Although the dialogue will not prevent you from adding columns for which you do not have write permissions to the list of editable columns, this will not override the server permissions, and an error will be raised if you later try to change the values of such a column. |
|
This set-up is sufficient to define a read-only connection. To end the configuration here you can click OK to close dialogue, then double click the DataView node in the Projects Tree to activate the DataView.
- To change a value, double click the cell(s) of one of the editable columns in the grid, The Property Change Dialogue opens.
- Type a value and click Set.
To learn more about editing value, check the Editing Properties of the DataSource section.
Create, Delete and other advanced operations
To authorise the users to create and delete "Rules of Credit", we can now define Actions.
We will create 2 actions that will execute stored procedures on the server, respectively named spCreateRuleOfCredit and spDeleteRuleOfCredit.
|
|
The procedures names must match stored procedures on your server. If the database that you are using does not have stored procedures to execute, you can type a SQL Statement instead of the procedure name. |
|
- To create a new Action, from the Advanced tab, click New Action.
- Select the Action Type 'Create'. The Action Type is used by BimSens to organise the commands in the user interface. Although there is no constraints on which Type you pick, it is better to select the one that best describe what the Action will do, in our case one creates object, the other deletes them.
The creation procedure takes 2 arguments, the ID of the parent activity, @ParentID, and a description for the rule, @RuleOfCredit
- Create a new parameter by entering the name @ParentID in the Parameter column
- Set the Type to Text and the Display Name to 'Parent Activity ID'
The Parent Activity ID must be the ID of an existing activity. To enforce it we will lock the parameter value to the Activity ID of the selected row in the grid when the action is ran:
- Set the Editing Mode to 'Locked'
- Set the Default Mode to RowValue to specify that the value for this parameter will be taken from the select row
- Set the Default Value Or Row Field to the name of the column to get the value from in the grid, in this case 'Activity ID'
- Create the second parameter @RuleOfCredit with a Type of Text, Display Name of 'Rule Description', Editing Mode of 'Required'
- Set the Default Mode to RowValue and the Default Value Or Row Field to Activity Name so that the parameter default value is the name of the activity the rule refers to.
The deletion procedure only take 1 argument @RuleID for which we define a similar Default Mode using the Rule ID field of the selected row. This parameter is defined as Locked so it will not be editable. As a result, when deleting a rule of credit, the user will be prompted for confirmation with the Rule ID of the selected row displayed but won't be able to modify it.
The Rule ID is not very informative as it is only a number. To make it easier for the user to identify and confirm what rule is being deleted we can add Reference parameters to display more meaningful information. To add a Reference parameter:
- Add a new parameter
- Leave the column Parameter blank
- Set the Display Name to 'Rule Description'
- Set the Editing mode to Reference
- Set the Default Mode to RowValue
- Set the Default Value to 'Rule Of Credit'
Repeat those steps with a second Reference parameter named 'Of Activity' which will default to the selected row Activity Name.
See the section on Actions Parameter to learn more about editing types for parameters.
We have now finished configuring the Advanced section, we can head back to the BimSens grid.
Click OK to close dialogue, then double click the DataView node in the Projects Tree to activate the DataView.
The 2 Actions button Create ![]() and Delete
and Delete ![]() are now available with their respective items RoC+ and RoCx. Each will open a dialogue to request user input or confirmation with the Required, Locked and Reference parameters.
are now available with their respective items RoC+ and RoCx. Each will open a dialogue to request user input or confirmation with the Required, Locked and Reference parameters.
|
|
Use the Import / Export button You can use this method to set-up multiple user profiles with different permissions but configure the root only once. For instance you can create one configuration file only allowing reporting of progress, and another for admin users allowing to create and delete rules of credit. |
|
Set up Change Notifications
SQL Server DataSource support change Notifications, and can be automatically refreshed, including re-apply a Colour Filter when a change is detected on the DataSource.
See the Walk through: Set up Notifications on SQL Server for more information.