This section demonstrates how to setup a Colour Filter to create a Look Ahead filter.
To do this walk through you need:
The test scenario uses a connection to Primavera P6 Web Services returning the Activity ID, Name, Planned and Actual Dates. You will create a Calculated Column to evaluate if the PlannedStartDate is within 1, 2 or 3 weeks or if it is already running late. You'll then use this column to create the Colour Filter with a Multiple Matches Resolution method in case an object is associated to more than one Activity.
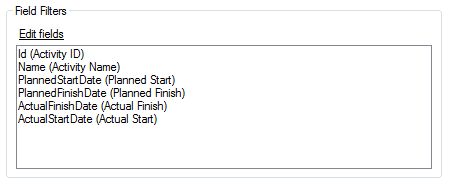
The P6 DataSource is setup with a single DataView that returns Activity ID, Name, Planned and Actual Dates as shown below.
See Primavera P6 Web Services for more details on how to setup a connection.
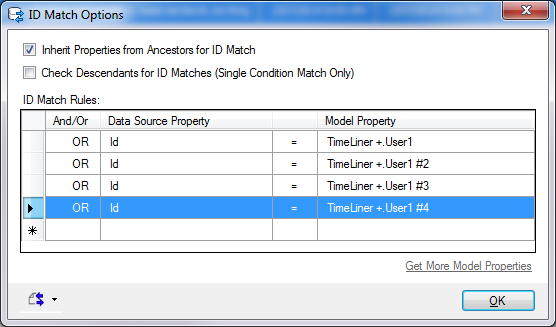
For this example we use Navisworks as a 3D viewer and objects have a user tab Timeliner+ with user defined properties User1, User1#2, User1#3 etc. that correspond to Ids (Activity IDs) of the P6 DataView. To associate them to the DataView, the ID Match is configured with alternative conditions for each user defined property in the model.
See Multiple Conditions in ID Match for more information on how to setup the ID Match.
IIF ( [ActualFinishDate] IS NOT NULL, ' Complete',
IIF ( [ActualStartDate] IS NOT NULL, 'Started',
IIF ( [PlannedStartDate] < '2014-03-11', 'Late',
IIF ( [PlannedStartDate] < '2014-03-18', 'Start this week',
IIF ( [PlannedStartDate] < '2014-03-25', 'Start next week',
IIF ( [PlannedStartDate] < '2014-04-01', 'Start in 2 weeks',
'Start in 3 weeks or more'
))))))
The formula is built as follow:
If a value is provided for the ActualFinishDate property then the grid row is marked as Complete.
If it was not provided, then if a value is provided for the ActualStartDate property the grid row is marked as Started.
If the ActualStartDate is not provided either, then if the PlannedStartDate is anterior to today's date the row is marked as Late.
If the PlannedStartDate is superior to today's date but anterior to today's date + 7 days the row is marked as Start this week.
Idem with today's date + 14 and + 21 days.
Finally if none of the above conditions was met, then the row is marked as Start in 3 weeks or more.
IIF ( [ActualFinishDate] IS NOT NULL, ' Complete',
IIF ( [ActualStartDate] IS NOT NULL, 'Started',
IIF ( [PlannedStartDate] < Today() , 'Late',
IIF ( [PlannedStartDate] < DateAdd( Week , 1, PeriodStart(Week)), 'Start this week',
IIF ( [PlannedStartDate] < DateAdd( Week , 2, PeriodStart(Week)), 'Start next week',
IIF ( [PlannedStartDate] < DateAdd( Week , 3, PeriodStart(Week)), 'Start in 2 weeks',
'Start in 3 weeks or more'
))))))
|
|
This formula does not pick up "Late Finish" situations, when the activity is started but not finished and yet the PlannedFinishDate has passed. Try to modify the formula to account for this Late Finish. |
|
You now have a new column in BimSens's Grid called Planned Start Look Ahead that contains the calculated statuses. Scroll through some rows to ensure your formula reports what you want.
You can use the reordering buttons at the top right of the form to give your statuses a logical order and pick an Appearance for each status.
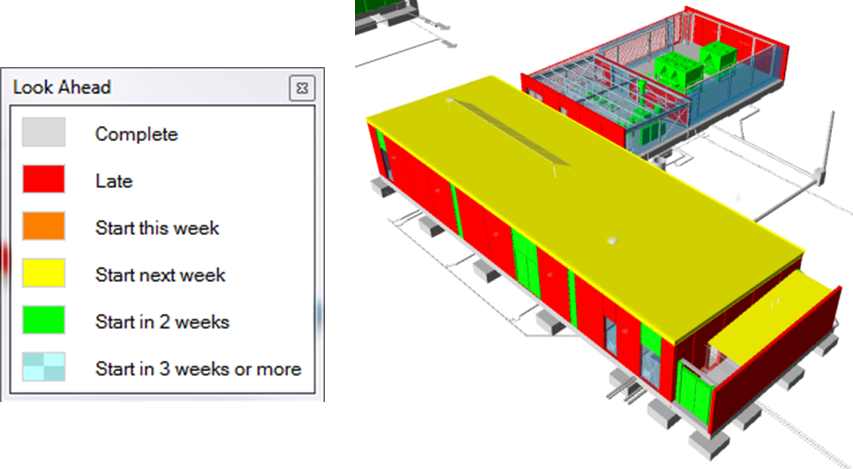
For this walk through, the activities marked as Complete will be light grey to fade in the background, Late to Start in 2 weeks are given bright colours from red to green in order of importance, and other activities are set to a blue transparent to allow us to see through. As we want to pick up objects that have no match pretty clearly the appearance for <ignored> is set to a Fuchsia with no transparency, but these objects will be hidden by default.

Some of our 3D objects have several properties with Activity IDs (User1, User1#2 etc.). If an object has 2 or 3 matches in the DataView and their calculated statuses are not the same, BimSens will change the colour for every match in the DataView, and the final colour will be that of the last match.
To make the process less random, we can activate the Multiple Matches Resolution, Filter Matches and use an Aggregate function if we still have Multiple Matches. See Resolving Multiple Matches for more information on Multiple Matches Resolution.
With this setup, if BimSens finds a 3D object with Multiple Matches, the object will have the colour associated to the status of the match that has the minimum value for the PlannedStartDate property i.e. the match that has the earliest PlannedStartDate.

This is not ideal because the match that has the earliest PlannedStartDate could be already complete while other match could be in progress. In that scenario the object will show up in 3D with a Complete status while it is associated to incomplete matches. To resolve this issue we can apply a different method.
Ideally, when an object has Multiple Matches, the DataView would show the most urgent status of all the matches. To achieve that result we need to assign a rank to each status.
There are 2 possibilities to rank statuses:
IIF ( [Planned Start Look Ahead] = 'Late' , 0,
IIF ( [Planned Start Look Ahead] = 'Start this week' , 1,
IIF ( [Planned Start Look Ahead] = 'Start next week' , 2,
IIF ( [Planned Start Look Ahead] = 'Start in 2 weeks' , 3,
IIF ( [Planned Start Look Ahead] = 'Start in 3 weeks or more' , 4,
6
)))))
To apply the filter later, open the Colour Filter menu, select the Look Ahead and click Apply. Click Key to display a floating Key while you navigate the model.
|
|
To apply the Colour Filter to selected objects only Select objects in 3D before applying it. It is much faster than to apply to the entire model, especially with the Multiple Matches Resolution active. |
|